THE PROCESS
CUSTOM DESIGN + PERSONAL SERVICE
I create unique, custom invitations for bar and bat mitzvahs, weddings, showers, engagement parties, anniversary parties, birthdays, sweet sixteens, quinceañeras, and any other occasion that calls for a special invitation that will make a big impression. From fun and funky to beautiful and elegant, I have you covered with unlimited options and possibilities. I am based in Tampa, Florida but am happy to serve clients worldwide!
My invitations are made from high quality papers in hundreds of colors, weights, and textures, as well as other materials such as acrylic, glitter, PVC, fabrics and more. I offer multiple printing options, including screen printing, foil, thermography, letterpress, embossing/debossing, and digital. Everything is made to order, and no shape, size or embellishment is off-limits, including envelope liners, pockets, belly bands, tags, die cuts, boxes, ribbons, twine, rhinestones and more. Any design we can imagine can be created in any color, paper, typesetting and material combination you choose. After I work with you to design your perfect invitation, I work with a team in India to produce the final product for you.
While some clients know exactly what they want from the start, for some, making all these selections can be a bit daunting and overwhelming! That’s why I’m here to help you every step of the way - from creating the perfect invitation suite to deciding on wording and fine-tuning every detail.
TIMING
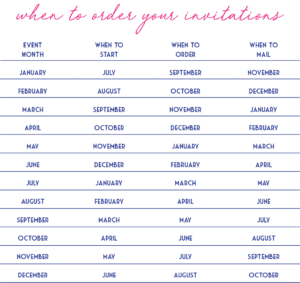
5+ months before event – begin design process
4 months before event – place final order
3 months before event – purchase postage; stuff, seal, and stamp invitations
2-3 months before event – mail invitations

For a stress-free process, I recommend we meet at least five months before the big day, placing your final order around 16 weeks before your event. This timeline will not only give you plenty of time once your invitations arrive to carefully prepare them for mailing, but it also allows for some “wiggle room” in the very rare event that there are any shipping delays or other issues.
If you have a rush order, please contact me to discuss.
PRICING
Custom invitation projects start as low as $800.
There is a very wide price range when it comes to custom invitations as there are infinite possibilities and options ranging from the most simple and basic to incredibly luxe. On average, my clients spend around $1,200-1,500 for their invitation suites. Pricing is calculated by the printer based on many factors, including paper selections, size, number of layers, printing method, embellishments, and quantity. Once we meet and get an idea of what you would like, I will request a quote from the printer. From there, we can tailor the selections as needed. The following guide will help give you an idea of base prices of a typical invitation suite.
Estimated Starting Prices:
Main invitation - $3.00
Envelope with return address - $2.00
Insert (i.e., party card or weekend details) - $1.00
RSVP set - $1.50
Thank you note set - $1.50
Guest address formatting and printing - $1.50
*Each invitation component is sold in sets of 25 with the exception of guest address printing
PROOFING
Once I create your invitation design, I will send proofs of your invitation suite via email. While most invitation companies charge for proofs, I include complimentary revisions to make sure everything is to your liking. Customers should keep timing in mind when making revision requests. Your final proof from the printer will show your invitation suite at every angle. Nothing goes to print without your full approval!
The proofing process is the time to review all wording, dates, spelling, punctuation, and design choices. It is important to review your proofs very carefully, as we print directly from the approved proof file. While I do my best to correct any obvious typos or errors, it is ultimately the responsibility of the client to assure the information shown on the proof is accurate. Upon your final proof approval, your order will immediately move into production. At that time, no changes can be made, including artwork and quantities. Any additional prints needed after the approved proof will be subject to different pricing.
ADDRESSING
Envelope addressing is available to coordinate exactly with your invitation, in the same ink and fonts, so you’ll be sure to impress your guests right from their first peek into the mailbox. If you would like your envelopes addressed, please download the following Excel spreadsheet required to collect your mailing addresses:
click here to download required guest address spreadsheet
BEFORE WE MEET
Before we meet, it’s helpful to start thinking about the following:
Design ideas - Colors, shape, size, font styles and overall look. I have samples that you can look through for ideas, but I find Instagram is the best place for the most current design inspiration as new content is constantly being posted. I am happy to point you in the right direction of where to look for ideas. Take screen shots and send them to me or bring pictures with you to our meeting so I know what aesthetic you are going for.
Components and wording - Do you want party info included on the main invite or on a separate card? Do you want an insert for out-of-towners with other weekend info, or will that be sent separately? Do you need one version of the RSVP card or two (such as one for locals who are just invited to service and party, and one for out-of-town guests who are invited to other weekend festivities, such as Friday dinner and Sunday brunch)? Do you want coordinating thank-you notes? Think about your needs so we can discuss them when we meet.
Budget - A ballpark figure from you is important for me to know as we get started so I can help you make the best choices and show you the best options for your budget.
If you have questions about the process, pricing, or anything else mentioned here, please give me a call or send me an email so I can help clarify before we schedule our consultation.
YOUR DESIGN CONSULTATION
If you think this is a good fit for your needs, it’s time to schedule a design consultation! There is a $100 non-refundable fee due at the time of our meeting that will be applied to your final order. The consultation will last about an hour. It is ideal to meet in person at my in-home studio in South Tampa so you can see actual samples and swatches. For clients outside of Tampa Bay, phone or video meetings are available. During your consultation, we’ll get into all the details of design, colors, content and more. I work with every client one-on-one to make sure you love every aspect of your invitations. When we meet, please have your questions and design ideas ready. Whether you know exactly what you need or whether you are looking for more guidance, I’m here to make this fun and easy for you.
FEE SCHEDULE
- A $100 non-refundable fee will be due at the time of your initial design consultation, which will be applied to your final order.
- Design work and proofing will begin once the signed Letter of Agreement and a deposit of 50% of the estimated total are received. The deposit will be applied to your final order.
- Remaining balance is due when the invitations are completed.
I gladly accept Venmo, PayPal, Zelle, check or cash.
CANCELLATIONS
Your design consultation fee is non-refundable; the fee will be applied to your final bill. Once design work has begun on your order, deposits are non-refundable. Orders in production with the printer cannot be cancelled and full amount will be owed.
MAILING TIPS
- Take a complete invitation suite (main envelope stuffed with an invitation and all inserts) to the post office. Have them weigh and measure it to give you an accurate postage price. There are many postage stamp designs available that will complement your invitation suite. You can purchase stamps at your local post office, or more options may be available online at www.usps.com.
- Your RSVP cards and thank you notes will require just one Forever stamp each. Don't forget to pre-stamp your RSVP envelopes. Do not include a return stamp for international guests as they will need to use a postage stamp from the country from which they are mailing.
- It is helpful to number RSVP cards and match them to the corresponding numbers on the address printout that comes enclosed with your completed invitations or your guest address Excel spreadsheet. This way, if a guest forgets to write their name on their RSVP card, you will still know who sent it. Mark lightly in pencil on the back corner of the card, or use an invisible ink pen with a UV light (such as these available on Amazon).
- Your invitations will come packed with vellum in each envelope and in between each insert to keep everything in pristine condition during international shipping. It is my preference to remove all vellum before mailing.
- When stuffing your invitation suites, arrange the invitation and inserts in the way that you want them to appear when guests open the envelope. Typically, pieces are stacked smallest to largest.
- The self-adhesive on the envelope is very strong! Press lightly when sealing to minimize damage to the envelope when your guests open them.
- If you seal your main envelope and realize you forgot to include something, such as an insert or a stamp on your RSVP envelope, try gently releasing the seal with hot air from a hair dryer.
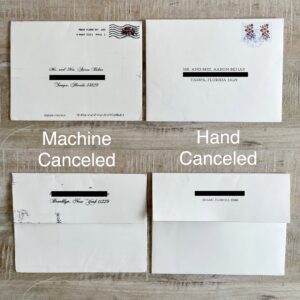
- When everything is stuffed, sealed and ready to mail, I recommend that you take your invitations to the post office and request that they are hand canceled. This means they will manually put an ink stamp over the postage stamp to show that it has been used, instead of putting them through a machine that leaves a long black track mark across your whole envelope and can potentially damage your envelope and invitation inside. If the post office staff is too busy to accommodate this request, they may allow you to hand cancel them yourself, or you can try going to a different post office or asking a different employee. Occasionally they will charge an additional fee for this service.
 .
. 

- Aim to mail your invitations 8-12 weeks prior to your event.
- When your special weekend arrives, bring an extra copy of your invitation to your photographer and videographer so they can take some artistic shots to include in your album and video.
- You may also want to display a copy of your invitation at your event, such as by your sign-in book or next to the kippot or programs.

 .
. 